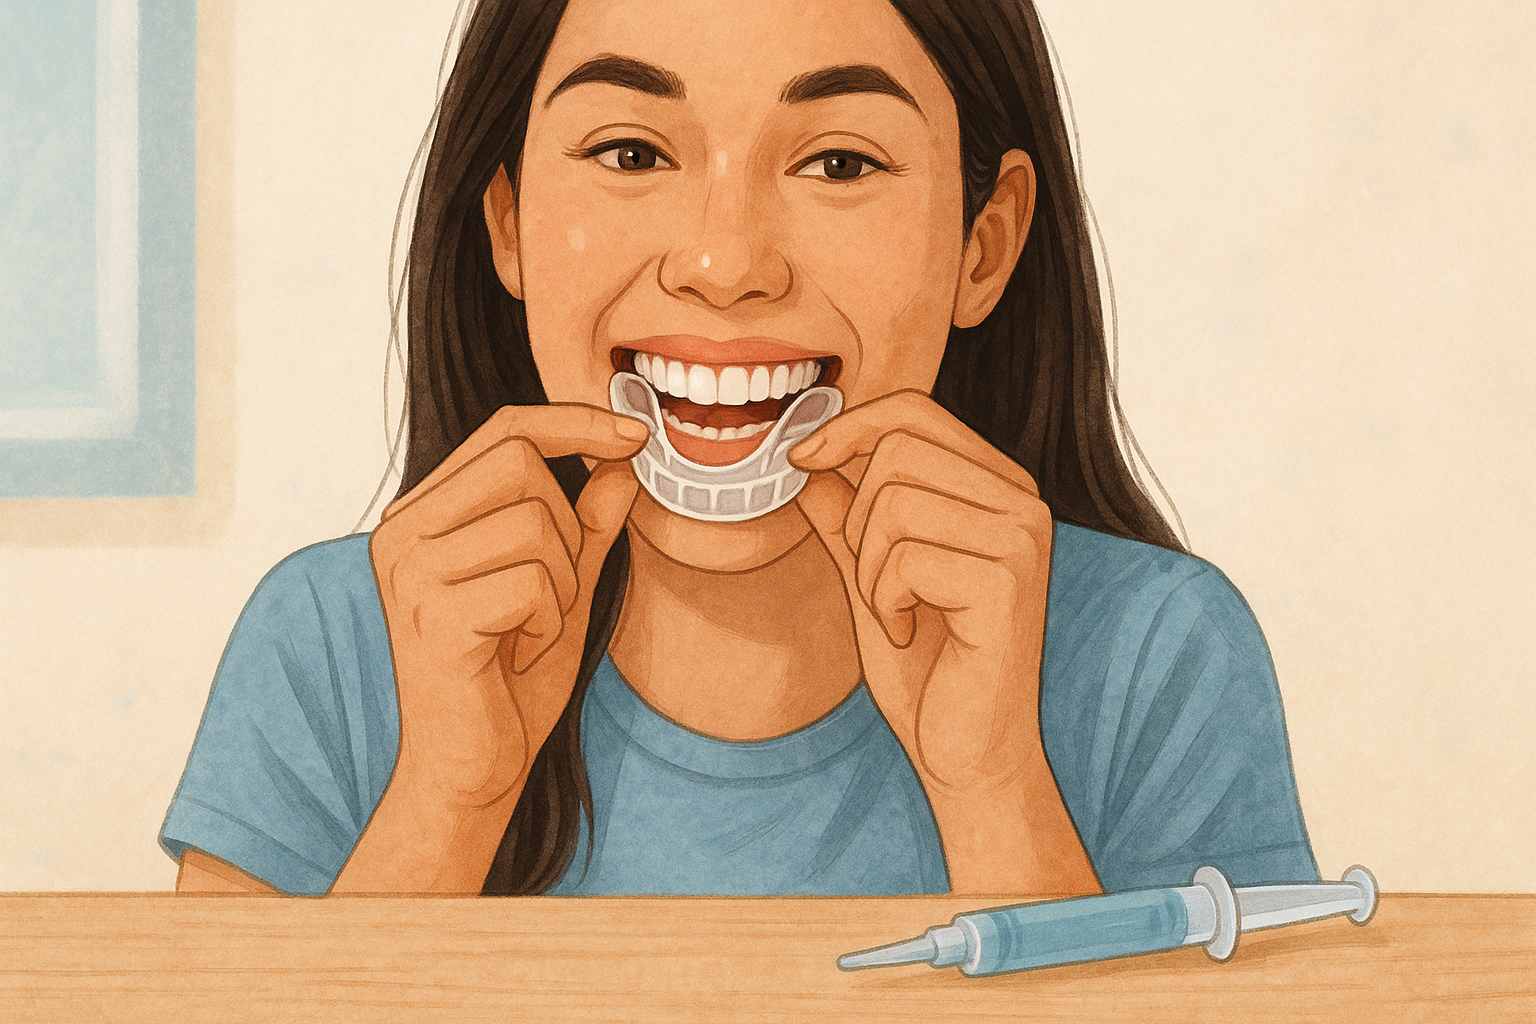
“A bright smile is more than just aesthetics—it’s a sign of confidence, care, and health. Teeth whitening trays offer a practical and effective way to remove stains and restore your teeth’s natural glow, all from the comfort of home.”
Understanding Whitening Trays & Preparation
Using whitening trays is one of the most effective and controlled ways to brighten your teeth, especially under dental supervision. Because trays allow you to distribute gel evenly across the tooth surfaces, they can deliver more consistent whitening results than strips or paints. But to get best results and avoid problems like tooth sensitivity or gum irritation, you need to follow a clear process. Let’s walk through everything you should know before you wear a tray for the first time.
What Are Whitening Trays & Why They Work
A whitening tray is a custom or semi-custom device shaped to fit your teeth. It holds whitening gel against each tooth’s front surface, allowing the gel’s active ingredient (often carbamide peroxide or hydrogen peroxide) to penetrate enamel over time. Because the gel is held in place, it has direct contact with the surfaces, which improves efficiency of the whitening gel.
There are generally two categories:
- Custom trays made by your dentist from an impression of your mouth. These offer the best fit, least gel leakage, and more even coverage of all front teeth and side teeth.
- Over-the-counter trays (boil-and-bite or generic molds). These are less precise and may allow excess gel to contact gums or miss parts of the tooth surface.
Whitening trays are especially useful for patients with sensitive teeth, because you can control the concentration of gel and the wear time. With trays, you can gradually increase the duration of wear rather than blasting your teeth all at once.
Step 1: Get Your Mouth Ready
Before using trays, it’s vital to begin with clean and dry teeth.
- Brush and floss thoroughly to remove plaque, food debris, or stains on the surface. Clean teeth allow the gel to make direct contact with enamel, improving penetration and reducing uneven whitening.
- Rinse well and gently dry your teeth and tray (if reusable) with a clean, lint-free cloth. Moisture interferes with gel adhesion.
- Inspect trays for any cracks, warping, or irregular edges. A snug tray ensures the whitening product stays where it should — on your teeth — and doesn’t touch soft tissues or gums.
Step 2: Load the Gel Carefully
Using too much gel is a common mistake. More gel doesn’t produce exponentially better whitening—it often leads to gum irritation or side effects. Instead, use the right dose and let the whitening process do the work.
- Apply a small line or dot of gel in the tray compartments where they will meet the front side of your teeth.
- Focus the gel on the front surfaces of front teeth and side teeth, as those are most visible.
- Avoid applying gel to the gum line, which can cause irritation.
- Snap the tray gently into place, pressing it against your teeth to ensure contact without bubbles or gaps.
Once trays are placed, remove any remaining gel that squeezes out using a clean finger or cotton swab. This limits contact with gums or soft tissues.
Step 3: Wear Time & Monitoring
How long you wear whitening trays depends on your sensitivity, the strength of the gel, and how aggressive your treatment is:
- Start with short durations (30–45 minutes) to test your tooth sensitivity.
- Over several days, you can increase wear time up to the recommendation (often 1–2 hours, or even overnight in lower concentrations).
- Many treatments suggest wearing trays daily for rounds of treatment, typically for 1–2 weeks, depending on how stubborn the tooth discoloration is.
- Always monitor for discomfort. If tooth sensitivity becomes sharp or lasting, reduce the wear time or switch to lower-concentration gel.
Because the whitening tray keeps the gel in direct contact with enamel, success depends heavily on consistent and even wear. Uneven pressure or loose trays result in patchy whitening.
Part 3 – Choosing the Right Trays & Whitening Gels for Your Needs
Every smile is unique—and so is every whitening journey. Choosing the correct whitening trays, gel type, and concentration is key to achieving your desired results safely and effectively. Whether you’re going the professional teeth whitening route or trying an at-home kit, understanding your options can help you get the brighter smile you’re after without compromising your dental health.
Types of Whitening Trays: Custom vs. Generic
There are two main types of teeth whitening trays available on the market:
1. Custom Trays (Professional Option)
- Provided by your dentist’s office and molded to fit your teeth exactly.
- Ideal for even distribution of the product, minimizing leakage and irritation.
- More effective at whitening front teeth and preventing excess gel from touching your gums.
- Typically used with high-quality, dentist-approved bleaching agents like carbamide peroxide or hydrogen peroxide.
Best for: People with tooth sensitivity, irregular alignment, or those wanting professional results at home.
2. Boil-and-Bite or Generic Trays (Over-the-Counter)
- These flexible plastic trays are softened in hot water, then molded to your teeth.
- Less precise, meaning potential for uneven whitening or gel spillage.
- Work well for first-timers, but may not produce optimal results in difficult cases or for severe tooth discoloration.
Best for: Budget-conscious users or those trying whitening for the first time.
Choosing the Right Whitening Gel
Whitening gels vary in strength, ingredients, and formulation. The most common active agents are:
- Carbamide Peroxide: Breaks down into hydrogen peroxide and urea. Gentler and slower-acting—commonly used in overnight trays.
- Hydrogen Peroxide: Stronger and faster—often used in daytime wear with shorter application times.
Concentration options:
- Low (10–16%) – ideal for people with sensitive teeth or who want a slow, gradual process.
- Medium (20–25%) – great for general use; balances speed and comfort.
- High (30–35%) – should only be used under dental supervision for professional teeth whitening.
💡 Tip: Never exceed recommended concentrations, as tooth enamel damage and gum irritation may occur.
Important Features to Look For
When comparing whitening products, look for:
- Gel thickness: A thicker gel stays in place better and offers a more uniform result.
- Flavoring agents: Mild mint or neutral tastes reduce the risk of gagging or nausea during wear.
- Stability: Products with longer shelf life and resistance to direct sunlight are more effective.
- Sensitive formulations: Look for added fluoride or potassium nitrate to help prevent tooth sensitivity.
If you have dental conditions such as gum disease, worn enamel, or tooth decay, always consult your dentist before beginning any whitening regimen.
Who Should Avoid Whitening Trays?
Whitening trays are generally safe, but not for everyone. You may need to postpone treatment or use alternatives if:
- You have braces, retainers, or dental appliances that interfere with the tray fit.
- You are pregnant or nursing (not enough research has confirmed safety).
- You have significant wear on your enamel or pediatric dentistry concerns for younger users.
- You’ve experienced reactions to bleaching agents in the past.
Managing Sensitivity, Aftercare & Maximizing Results
While teeth whitening trays can lead to a brighter smile, they’re not without challenges—particularly when it comes to tooth sensitivity, gum irritation, or prolonged results. In this section, we’ll break down how to avoid common issues, care for your trays, and maintain your new white teeth longer.
Dealing with Tooth Sensitivity
One of the most common side effects during the whitening process is tooth sensitivity, especially when using higher concentrations of carbamide peroxide or hydrogen peroxide. The bleaching agent penetrates the tooth enamel to remove stains, which can irritate the nerves in some people.
Tips to reduce sensitivity:
- Start slowly: If this is your first time, use a lower-strength whitening product and reduce wear time to 30 minutes every other day.
- Use desensitizing toothpaste: Brands with potassium nitrate or fluoride can help calm the nerves inside teeth. Use for at least a week before and during your treatment.
- Avoid acidic foods: Citrus, soda, or vinegar-based items can worsen sensitivity after whitening.
- Talk to your dentist: If discomfort continues, they may suggest a different gel or recommend a shorter treatment time.
Remember: Sensitivity doesn’t mean damage—it usually resolves within a few days of stopping treatment.
Cleaning & Caring for Your Whitening Trays
Proper tray hygiene ensures both your safety and the efficiency of the whitening gel.
- After each use: Rinse trays under cool water (never hot) and brush gently with a soft toothbrush—no toothpaste, as it can damage the plastic.
- Avoid direct sunlight: Store trays in a cool, dry place to prevent warping.
- Keep gel away from light: Most whitening products lose strength when exposed to heat or UV light. Follow expiration dates and storage instructions carefully.
If you’re using custom trays, make sure they stay in their case when not in use. Generic dental whitening trays should be replaced more often as they tend to degrade quickly.
Avoiding Gum Irritation & Overuse
Using more gel doesn’t mean better whitening—it often leads to irritation and waste. To avoid gum problems:
- Don’t overload the tray. A small, rice-sized dot of gel per tooth is enough.
- Wipe excess gel immediately if it seeps out during wear.
- Don’t exceed recommended time: Wearing trays longer than advised increases the risk of both tooth and gum sensitivity.
- Skip whitening for a few days if gums feel raw or inflamed, and resume only after they’ve fully healed.
How to Maintain Your Bright Smile
Once your whitening treatment is complete, protecting your investment is essential. A few habits can make your whiter teeth last longer:
- Avoid stain-causing foods/drinks: Limit red wine, coffee, tea, soy sauce, and berries. If you do indulge, rinse with water right after or use a straw to bypass the front teeth.
- Quit smoking: Tobacco is one of the worst culprits for yellowing enamel and ruining results.
- Maintain oral hygiene: Brush twice a day, floss daily, and use whitening toothpaste 2–3 times a week to prevent surface stains.
- Regular touch-ups: Most people benefit from doing a short round of whitening every 3–6 months, especially if consuming staining products.
If needed, ask your dental provider about professional teeth whitening alternatives for long-lasting brightness.
Step-by-Step Instructions & Final Tips for Success
Using teeth whitening trays effectively isn’t just about applying gel and hoping for the best. There’s a correct technique to follow to ensure that the whitening process is safe, comfortable, and delivers optimal results. In this final part, you’ll get a complete step-by-step guide, followed by expert tips and a helpful checklist to make your brighter smile journey a success.
Step-by-Step Guide to Using Whitening Trays
Step 1: Clean Your Teeth Thoroughly
Start by brushing and flossing your teeth. Removing food particles and surface plaque ensures the whitening gel contacts the tooth enamel directly for maximum effect. Use a fluoride-free toothpaste to avoid interference with the bleaching agent.
Step 2: Prepare the Whitening Trays
If using custom trays, make sure they’re dry and clean. For over-the-counter trays, mold them if needed (e.g., boil-and-bite types). Apply a small amount of the gel—about a droplet the size of a grain of rice—into the front side of each tooth compartment, focusing only on the front teeth unless otherwise directed.
⚠️ Avoid overfilling. Too much gel can ooze out and cause gum irritation.
Step 3: Insert the Trays Carefully
Gently place the trays over your teeth. Press them lightly to ensure even contact with the enamel, especially the fronts of your teeth where stains are most visible. Avoid biting down too hard to prevent gel displacement.
Step 4: Wear for the Recommended Time
Follow the instructions on your specific whitening product. Typical wear times range from:
- 20–30 minutes (high-peroxide gels)
- 1–2 hours (medium strength)
- Overnight (low-strength carbamide peroxide in custom trays)
Stick to the time limit to avoid tooth sensitivity or damage.
Step 5: Remove and Rinse
After the session:
- Take off the trays.
- Rinse your mouth thoroughly with cool water to eliminate leftover gel.
- Gently brush with a soft-bristled brush and fluoride toothpaste to neutralize acidity and protect your tooth enamel.
Clean your trays using lukewarm water and a toothbrush—never hot water, as it may warp the shape.
Aftercare & Tips for Best Results
✅ Avoid staining foods/drinks (coffee, tea, red wine, tomato sauce) for at least 24 hours post-treatment.
✅ Stay hydrated – drinking water helps flush away stain-causing particles.
✅ Use a desensitizing gel or ACP paste if you experience sensitive teeth after treatment.
✅ Store trays and gels in a cool, dry place away from direct sunlight to extend shelf life.
Final Checklist
Before beginning your treatment, ask yourself:
☐ Have I had a recent dental exam to check for cavities or gum issues?
☐ Do I have custom trays or well-fitting over-the-counter ones?
☐ Am I using the correct gel concentration for my needs?
☐ Have I read the full instructions from the manufacturer or my dental office?
Answering “yes” to all? You’re ready to begin your safe, at-home whitening treatment!